
To make your own version of the Office Bag, follow the sewing instructions below. On this page, you will find the free file containing the measurements/cutting list and materials list.
Continue reading to download the free measurements. Cut out the pieces needed to make the bag according to the measurements on the cutting list.
Please note that reading these sewing instructions goes hand in hand with watching the YouTube tutorial. Find the tutorial below.
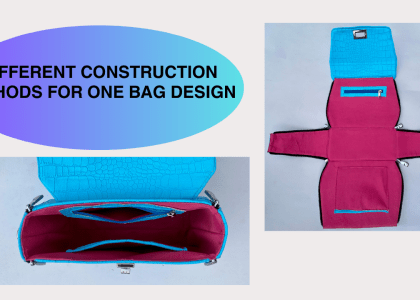
(i) The Exterior
STEP 1: Main Panel
- Draw a line 10” in from both short edges of the Main Panel Decovil heavy or Kariboard.
- Mark a 1” from each corner on the short edges.
- Draw a slanted line to match the 1” mark to the closest 10” drawn in the first step.
- Repeat the previous step for the remaining 1” mark on each corner.
- Cut on the slanted line.
- Use the panel you have been working with to cut out the Chiboard/Decovil light. Cut ¼” on the long edges of the Main Panel Chiboard/Decovil light.
- Fold the 10” line to form the basic shape of the bag.
- Optionally, glue foam to the Front and back area of the interfacing to make it puffy, and glue the Base Panel centered on the base area of the Main Panel.
- Now, lay your exterior material wrong side up and set the foam side of the Main Panel on it, then glue it in place.
- Cut the Exterior ½’ bigger than the Main Interfacing
- Fold the excess exterior to cover the edge of the Interfacing, and use glue to hold it in place.
- On the Interfacing side of the Main Panel, draw a 2” line in from the short edges and 1¼” from the long edges of the base area. Also, draw a line at the center.
- Now, install the purse feet at each intersection of the lines from the previous step.
STEP 2: Handle Panel
- Draw a line down the center of the long edge of the Handle Panel.
- Fold each long raw edge to the center line using DST or glue.
- Run a strip of DST along the center and align a handle cord on it, starting and stopping 3” from the short edges.
- Fold in half again so the width now measures 3/4”. Clip it in place.
- Sew the edge with 1/8″ seam allowance.
- Repeat all previous steps to make the second Handle Panel.
- Take the square ring and insert the short edges on the Handle Panel on each of them, clip and sew, or use rivets to hold it in place.
- Now, take the Connector pieces and on the WS, draw a line down the center of the long edge.
- Fold each side in half towards the center.
- Repeat the 2 previous steps to complete the 3 remaining Connectors.
- Insert a Connector on one square ring on one of the Handle Panels and hold the short raw edges to the center wrong sides together, use glue to hold it in place.
- Repeat the previous step to complete the 3 remaining Connectors.
- Now, place one Handle 3.75” from the side edge and 3.75” from the top edge, and sew the Connector to the Main Panel with ⅛” seam allowance.
STEP 3: Side Panel
- Take one Side Panel and draw a line 1” in from the short and long edges on one corner.
- Repeat the previous step for the other corner on the same short edge.
- Cut out the 1” box.
- Now, on the other short edge, make a mark 1.5” from the long edge. Repeat for the other corner on the same short edge.
- Draw a slanted line to match the 1.5” mark to the bottom edge. (As shown in the video)
- Repeat the previous step for the remaining 1” mark on each corner.
- Cut on the slanted line.
- Use the panel you have been working with to cut the shape of the second heavy interfacing and the two Chiboard/Decovil light.
- Cut ¼” on the long edges of the Side Panel Chiboard/Decovil light.
- Now, lay your exterior material wrong side up and set the heavy interfacing for the Side Panel on it, then glue it in place.
- Also, lay your Lining material wrong side up and set the Light interfacing for the Side Panel on it, then glue it in place.
- Cut the Exterior and lining ½” bigger than the Interfacings.
- Take the Side Panels, fold the bottom corners RST, and clip them in place.
- Sew them with ⅜” (1cm) SA.
- Cut the seam allowance fold without cutting into the stitches, and use glue or DST to hold the seam open to reduce bulk.
- Fold the excess exterior and lining to cover the top, side, and bottom edges of the Interfacing, and use glue to hold it in place. Leave the 1” box corner unfolded.
- Hold the one exterior and lining wrong sides together and sew the top edge with a ⅛” seam allowance.
- Repeat the previous step for the remaining Side panel Lining and Main Panel.
(ii) The Lining
- Lay your Lining material wrong side up and set the light interfacing for the main Panel on it, then glue it in place.
- Cut the lining ½’ bigger than the Interfacing.
- Fold the excess lining to cover the edge of the Interfacing, and use glue to hold it in place.
STEP 4: Laptop Pocket
- Lay the Laptop Pocket lining wrong side up and center the foam on one edge. Now, cover the foam with the opposite edge from which you centered it.
- Use the excess lining to cover the foam and sew that edge, leaving the new measurement of the lining at approximately 8’ x 17.5”
- Sew the lining where the foam ends on the short edges.
- Now, place the Laptop Pocket on the Lining Panel 1¼” from one short edge of the Lining Panel.
- Sew the short edges of the Laptop Pocket to the edge of the Lining Panel.
STEP 5: Slip Pocket
- Take the Slip Pocket and fold it right sides together, aligning the short edges. Clip in place.
- Sew both sides with 1/4″ seam allowance. Snip the corners so that it will lie flat after turning it to the right sides.
- Turn to the right sides through the edge you did not sew and press.
- Fold the Slip Pocket Trim on the long edge to cover the raw edge of the Slip Pocket, and clip it in place.
- Topstitch with ⅛” seam allowance, from the inner edge of the Slip Pocket Trim.
- Cut the excess Slip Pocket Trim away.
- Lay the Top edge of the Slip Pocket right sides up on the right sides of the other Lining Panel, 2.5″ from the top edge and at the center.
- Start sewing down one side, across the bottom edge, and up the other side of the Slip Pocket with ⅛” seam allowance.
(iii) Assemble The Exterior & Lining
- Align the Main Panel and the Main Lining, wrong sides together, glue or use DST to hold them together. I recommend using strong glue or contact cement.
- Sew the top edges with ⅛” SA, and move the Handle Panel out of the way as you sew.
- Take the Main Panel and one Side Panel, match their edges wrong sides together, and clip them in place.
- Tip: Start by matching the bottom center, and then match the top edges of the Side Panel to the top of the Main Panel, then clip the middle in between.
- Sew with ⅛” SA.
- Repeat steps last 2 steps for the opposite side of the Main Panel and the other Side Panel
- Fix the zipper pull and the zipper end on the zipper tape.
List of Materials
- Exterior Fabric: Faux leather ½ yard
- Decocil Heavy or Kariboard ½ yard
- Decocil Light or Chiboard ½ yard
- Foam: ½ yard
- Lining: ½ yard
- Zipper Tape: 18”
- Zipper Pull: 1
- Handle Cord: (15” on each collar) For adding structure to the handle.
- D-Ring: (4) To connect the Handle.
- Purse Feet: 6
- Super Glue (Optional): To secure the handle covers.
- Edge Finish: Your soldering iron (or Edge Coat).
Download the measurement below.