Hey fellow bag makers!
Today, I want to share a game-changing technique I recently discovered that’s going to revolutionize how you finish the edges of your handmade bags. If you’re anything like me, you’ve probably wrestled with expensive edge paints, messy applications, and the seemingly endless wait for them to dry. Well, prepare to say goodbye to all that!
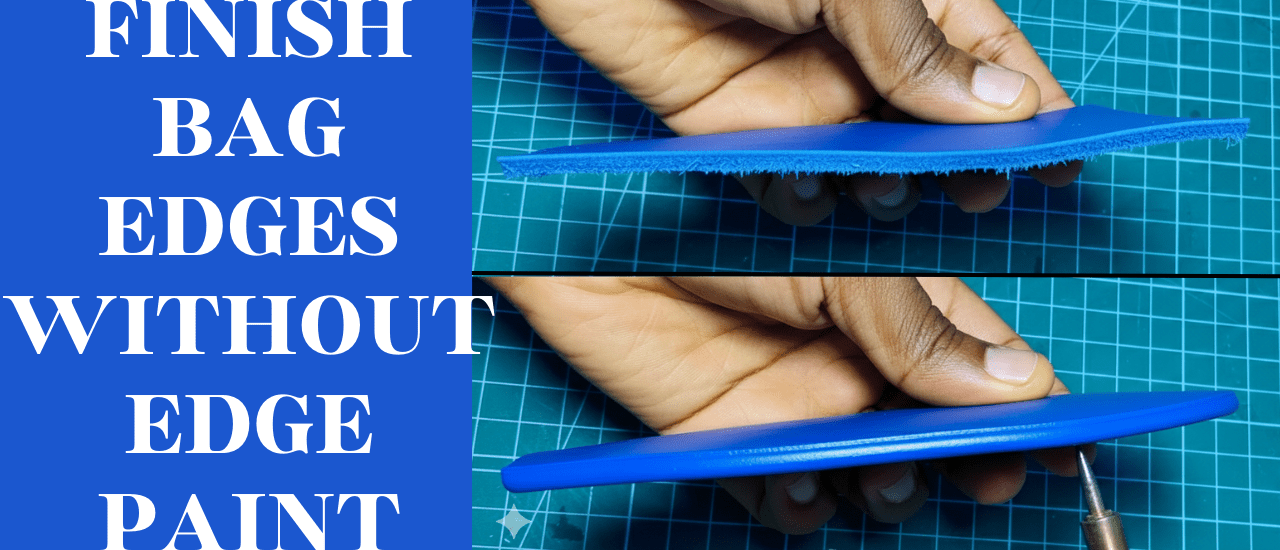
I’ve found that a simple soldering iron can create incredibly professional, durable, and clean edge finishes on both genuine and faux leather, making those costly edge coats a thing of the past.
You might be thinking, “A soldering iron? For bag edges?” Yes! And once you try it, you’ll wonder how you ever lived without this ingenious method.
Watch the video tutorial where I use this techniques on a bag I made, click here to watch now.
Why Your Soldering Iron is Your New Best Friend for Bag Edges
Let’s break down the incredible advantages of using a soldering iron (or a dedicated heat creaser, but a soldering iron works just fine!) for finishing your bag edges:
1. Say Goodbye to Expensive Edge Coats (Save Your Money!)
This is perhaps the biggest win! Quality edge paints can be surprisingly pricey, especially when you need multiple colors. The cost quickly adds up, eating into your project budget. With a soldering iron, your initial investment is minimal (you might even already own one!), and there are no ongoing consumables to buy. It’s a one-time purchase that pays dividends project after project.
2. No More Color-Matching Headaches for Faux Leather!
How many times have you struggled to find the perfect shade of edge paint to match your faux leather? It can be a real challenge, leading to compromises that detract from your bag’s overall look. When you use a soldering iron for finishing, particularly with faux leather, you’re not adding a new color. You’re simply sealing and shaping the existing material’s edge, creating a seamless and perfectly matched finish every single time. It’s the ultimate in color consistency!
3. Works Wonders on Both Genuine and Faux Leather
This technique isn’t limited to one material. Whether you’re crafting with supple genuine leather or vibrant faux leather, the soldering iron delivers fantastic results.
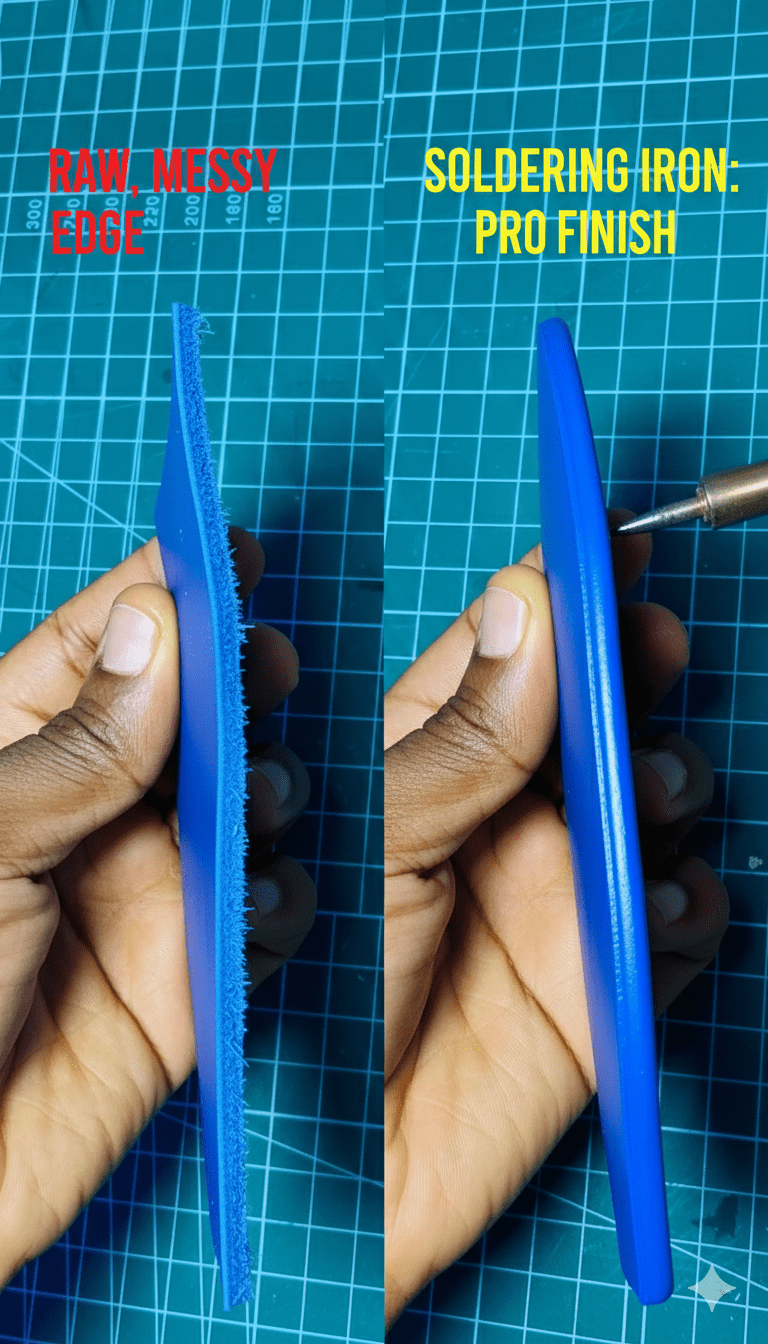
- For Faux Leather: The heat gently melts and fuses the synthetic fibers along the raw edge, creating a smooth, sealed, and incredibly durable finish that resists fraying. It essentially “welds” the layers together.
- For Genuine Leather: When combined with a bit of beeswax or a traditional burnishing compound, the heat from the iron helps to compress and seal the leather fibers, creating a dense, smooth, and polished edge that’s resistant to wear and moisture. It’s a form of heat-burning that yields stunning results.
4. Lightning Fast! No More Waiting for Drying Time
One of the most frustrating aspects of traditional edge paint is the drying time. Multiple coats, waiting between each one, and then the final cure time – it adds hours (or even days) to your project! With the soldering-iron method, the results are immediate. As soon as you pass the iron over the edge, the job is done. This dramatically speeds up your workflow and gets your beautiful bags finished faster.
5. Achieve Professional Neatness, Even as a Beginner
Let’s be honest, applying edge paint perfectly can be tricky. It’s easy to get messy, apply too much, or end up with an uneven finish, especially when you’re just starting out. The soldering iron technique, while requiring a little practice, is surprisingly forgiving and allows for incredibly neat results right from the start. You’re working directly on the edge, sealing it cleanly without the risk of drips or uneven coating. Your finished edges will look incredibly professional, giving your handmade bags that high-end, store-bought appeal.
Step-by-Step Professional Edge Finishing Using Soldering Iron
1. The Prep Work (The Most Important Part)
Before you touch the iron, ensure your edges are perfectly flush. If one layer of material is sticking out further than the other, the heat won’t fix it; it will just highlight the bump. Trim the edges to the same size; it should also be smooth and consistent.
2. The Wax Barrier
Apply a light layer of beeswax or a specific edge wax.
- Why? It acts as a lubricant so the iron glides rather than drags.
- Caution: Don’t overdo it. If the wax is too thick, it will boil and create bubbles in your finished edge. A “light rub” is exactly right.
3. The Heat Seal
Set your soldering iron to a medium-low heat. If your iron doesn’t have a temperature dial, let it heat up and then unplug it for 30 seconds before use so it isn’t “red hot.”
- The Motion: Use a steady, rolling motion. Do not stay in one spot for more than a second, or you risk melting a “divot” into the faux leather or burning the fabric backing.
- The Goal: You are looking to slightly “mushroom” the edge. The heat shrinks the synthetic fibers and rounds the sharp corners into a smooth, organic curve.
⚠️ Pro-Tips for Faux Leather
Unlike genuine leather, faux leather (PU or PVC) has a very low melting point.
- Test on a Scrap: Always test the heat on a leftover piece of the exact same material. Some synthetics will shrink beautifully, while others might shrivel or release unpleasant fumes.
- Safety Note: Work in a well-ventilated room. Melting synthetic materials (faux leather) can release fumes that you definitely don’t want to breathe in for long periods.
Ready to Try It?
This simple tool can truly transform your bag-making process, saving you money, time, and frustration while elevating the quality of your finished products.
Stay tuned for my next post!
Have you tried this technique before, or are you excited to give it a go? Let me know in the comments below!